Movie Tool
It places multiple videos into different sections of frame and encode it to a final video.
It uses avs script for coding which is the api language of aviSynth software.
I) Introductionn to AviSynth :-
"AviSynth is a powerful tool for video post-production. It provides ways of editing and processing videos." - aviSynth wiki
It doesn't have any gui, instead it generates the avs script, which in turn processes the source video according to code in script.
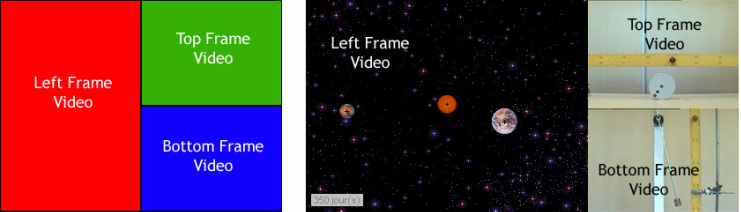
II) Output :-
Videos in two panes layout side by side, right pane having two frames vertically laid.
II) Installation :-
Get the aviSynth package for windows.
Install both packages by following the instructions ships with packages.
II) Processing :-
a) Source clips and images - one for left frame, other for top frame and last for bottom frame.
Use AVISorce command to source avi clips and ImageSource to source images.
Code :-
left_frame_clip = AVISource("G:\download\sample\l.avi")
top_frame_clip = ImageSource("G:\download\sample\t.jpg")
bottom_frame_clip = ImageSource("G:\download\sample\b.jpg")
b) Resize bottom clip - make bottom clip width equal to top clip while maintaining the aspect ratio.
We will use BilinearResize function to scale bottom clip.
Code :-
# top frame width
resize_width = top_frame_clip.width()
# calculate the bottom clip aspect ratio
bottom_frame_aspect = float(bottom_frame_clip.width()) / bottom_frame_clip.height()
# resulting bottom clip height according to the top frame width
bottom_frame_height = int(resize_width / bottom_frame_aspect)
# resize the bottom clip, bottom clip width = top frame width
bottom_frame_clip = bottom_frame_clip.BilinearResize(resize_width, bottom_frame_height)
Note : we need to do the above step because its a necessary condition for next step
c) Stack Right Pane Clips Vertically - club the top clip over to bottom clip.
Code :-
right_frame_clip = StackVertical(top_frame_clip, bottom_frame_clip)
Note : width of all the clips needs to be equal for StackVertical command.
d) Resize right pane clip - make right frame clip(result of above step) height equal to left frame clip while maintaining the aspect ratio.
Code :-
resize_height = left_frame_clip.height()
right_frame_aspect = float(right_frame_clip.width()) / right_frame_clip.height()
right_frame_width = int(resize_height * right_frame_aspect)
right_frame_clip = right_frame_clip.BilinearResize(right_frame_width, resize_height)
e) Stack Clips Horizontally - take the final right frame clip and left frame clip and keep them side by side
Code :-
final_frame_clip = StackHorizontal(left_frame_clip, right_frame_clip)
Note : height of all the clips needs to be equal for StackHorizontal command.
f) Label text - apply the label text on all the frames of the resulting final clip.
Subtitle command is used to add text on the clips.
Code :-
# Below all three commands for adding text are club together
# 1. Add label to left frame
# 2. Add label to top frame
# 3. Add label to bottom frame
final_frame_clip.Subtitle("Left Frame", x=3, y=3).\
Subtitle("Top Frame", x=left_frame_clip.width()+3, y=0).\
Subtitle("Bottom Frame", x=left_frame_clip.width()+3, y=left_frame_clip.height()-17)
Note : As avs script supports "." notation, we can join multiple commands together in a single statement.
g) Save and Run - save the above script as <name>.avs file in storage and run script in any supportive player.
IV) Usage :- I used the same process for a tool which generates and encodes the lineup of multiple shots.
It may also be use for showing turntables of assets with different camera views.
IV) Download :- download the final version of resulting script.
| 3viewlayout.avs |
HTML Comment Box is loading comments...
